If we are working in an environment that is larger than a single computer, it is likely that we need to map network drives to access files shared between people and devices.
To map a network drive in XYplorer go to Tools>Tools Special>Map Network drive.
Let's explore the full story of mapping network drives in XYplorer.
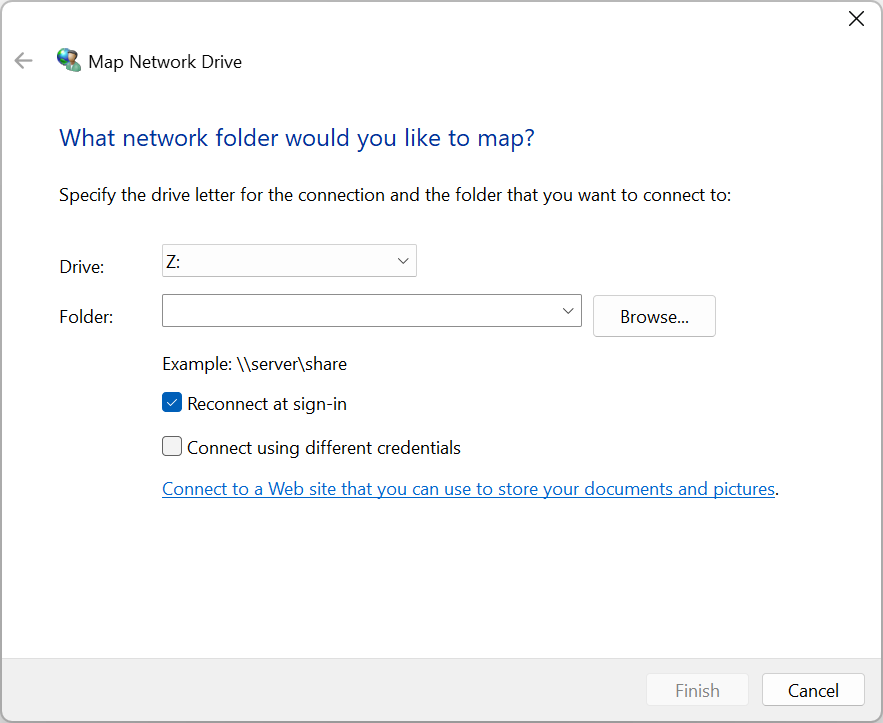
Once we have opened the Map network drive interface, we are presented with the same screen that we would if we were to map a network drive through Windows Explorer.

Here we can choose a drive letter we want to assign our network share. Allowing us to access the share through a drive letter as well as directly from the tree view in XYplorer.
You can choose any drive letter that isn't already taken. Just keep in mind that if you have some application configured with paths with a specific drive letter, you might need to use that letter to not break any paths.
Also, if you are part of a team that uses the same drive letter for a share, you also might want to use the same drive letter as everybody else so that you can all use the same path.
Next, we have a couple of checkbox options.
The first is to reconnect at sign in, making the share available for the chosen drive letter immediately after every login.
The connect using different credentials makes it so that you get prompted for a username and password for the shared drive if one is needed after you press finish on this dialogue.
If you are part of a larger network of computers that use Active Directory to manage users, you most likely don't need to check this.
But for smaller networks, user management might not be handled in a centralized way, and you might need to use an account that exists on the computer that is sharing the network drive.
There are two ways we can find a shared network drive. Either we know the location, so we can just input the path in the folder field, or we can browse for it on the network.
Browsing for a shared folder can be a bit tricky and slow sometimes. Browsing requires the correct infrastructure setup on the network for computers to be able to find each other by name.
By default, Windows computers should determine among themselves who is the browse master and therefore also in charge of handling out name to IP adress mappings for anyone asking on the network. But this doesn't always work as intended.
Also, often computers may be configured to not be findable on the network by browsing.
So, for smaller networks, it is best to simply input the correct path manually. Network paths start with a double backslash, \\ followed by the name of the computer we want to access. We can also use the IP adress directly.
Next, we write the shared folder path. It might look something like this.
\\computername\foldershare\subfolder
The network mapping then allows us to reach this path by simply typing a drive letter and colon.
If you just need do access a network share temporarily, you might want to disconnect it after use, in this case you can go to Tools->Tools Special->Disconnect network drive after you finished using it.
You will be prompted with a list of mapped network drives to choose from to disconnect when you press OK.
If for some reason, your network drive is listed in the tree menu, but you cannot reach it, you might have to reconnect it. For this, you can either go to Tools->Tools Special->Reconnect network drive or you can click the drive in the tree view.
If credentials are needed for you to access the drive, you will be prompted to enter the information at this point.
There are several reasons why network shares might not connect correctly, but it usually boils down to these things:
Make sure that you have typed the path correctly, you might be using forward slash instead of backslash or a space or spelling mistake might have crept in.
If you are struggling with getting the right credentials, we know that we reached the host sharing the network drive. In this case, we need to have credentials that are valid for the computer sharing the network drive.
If we are not on a larger network with an Active Directory server managing usernames and passwords, we likely have to use a username and password combo that is available locally on the remote computer.
If the computer sharing a drive cannot be found, it is likely that we will have an issue with resolving the computer name to an IP adress.
On the sharing computer, run an ipconfig command in the command line to view a list of IPv4 addresses. Find the one that is listed under the ethernet adapter if multiple is presented.
It is likely that the adress starts with 192.168 or 10.
Just know that computers can change IP adresses if they are not statically configured.
In this article we learned how to connect shared network drives in XYplorer. We also looked at how the interface works, what goes into mapping a shared network path to a drive letter and some edge cases where we might need to reconnect or disconnect drives.
We also looked at some troubleshooting tips for when a network drive simply won't connect correctly.
I hope it was helpful and thanks for your time.
