ShareX is an open-source software primarily aimed at enhancing the user experience when it comes to taking screen shots. However, ShareX can also be used to record videos of your screen as well as capturing sound to help users record explainer videos and similar content.
To record your screen using ShareX, open ShareX, go to Capture>Screen Recording. Now hover the area of the screen you want to capture or click and drag to create a custom area. To end the recording press Stop. You can also pause or abort just below the recording area.
Let's explore our screen recording options and settings in a bit more detail.
With ShareX default settings we can start a screen recording by pressing Shift+Print screen or go to Capture>Screen recording. The benefit of using the shortcut is that we don't have to have ShareX open to use it. It is available at any time since ShareX can run in the background.
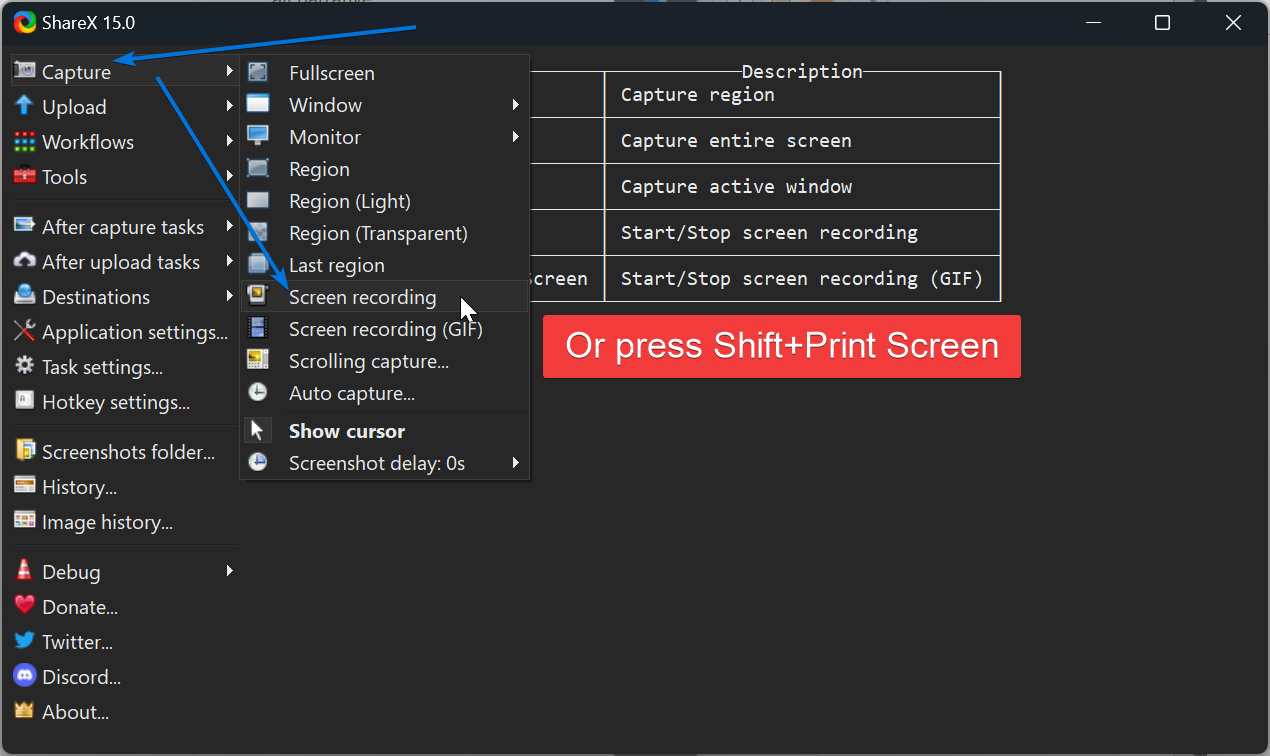
If we want to record and save the recording as a gif file, we can do that as well, but we then choose the Screen recording whth the (GIF) added or use the shortcut Ctrl+Shift+Print Screen instead.
Once we have started the workflow, we need to choose an area we want to record. If you hover your mouse over a Window, you will see a marching ants dotted line outline around that Window. Click to confirm the area as your recording area.
You can also click and drag a custom area to record.
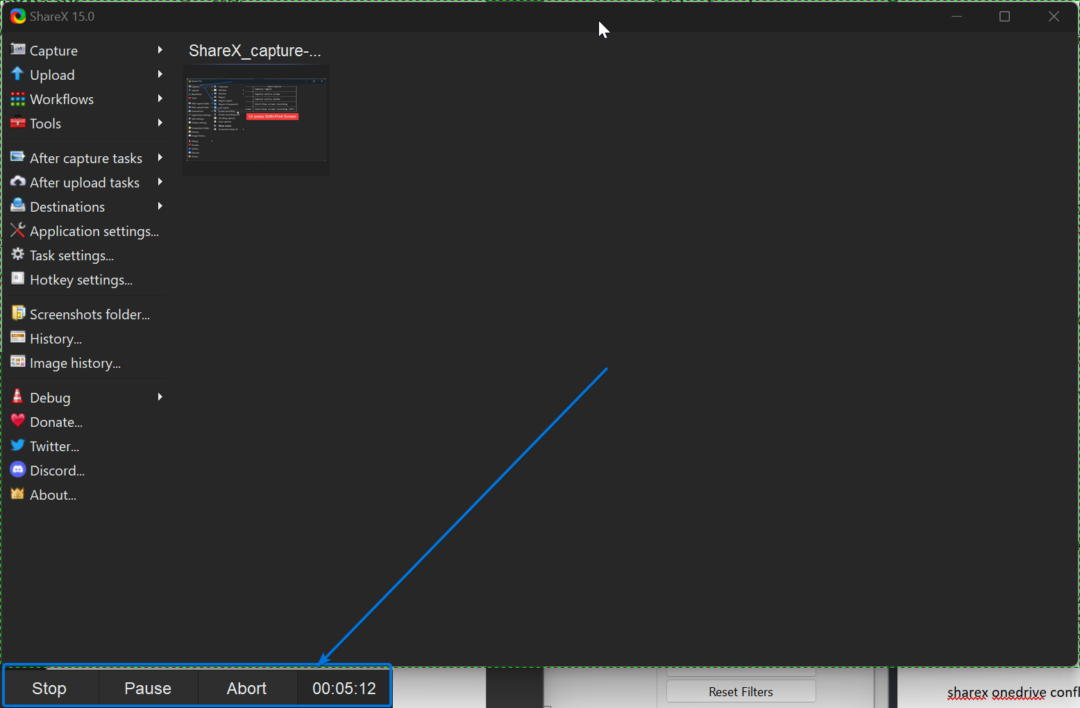
Once we have chosen an area, three buttons below the selected area will be available. Stop, pause and abort. We can use these as their names suggest. The difference between abort and stop is that after we press stop the recording will be saved to our shareX output folder while abort will delete the recording.
Here you can see how it looks when I record the ShareX application Window.
We can also go to the tray icons in the bottom right corner by the clock in Windows and find the red dot icon indicating that a recording is ongoing. Click the icon to stop and save the recording.
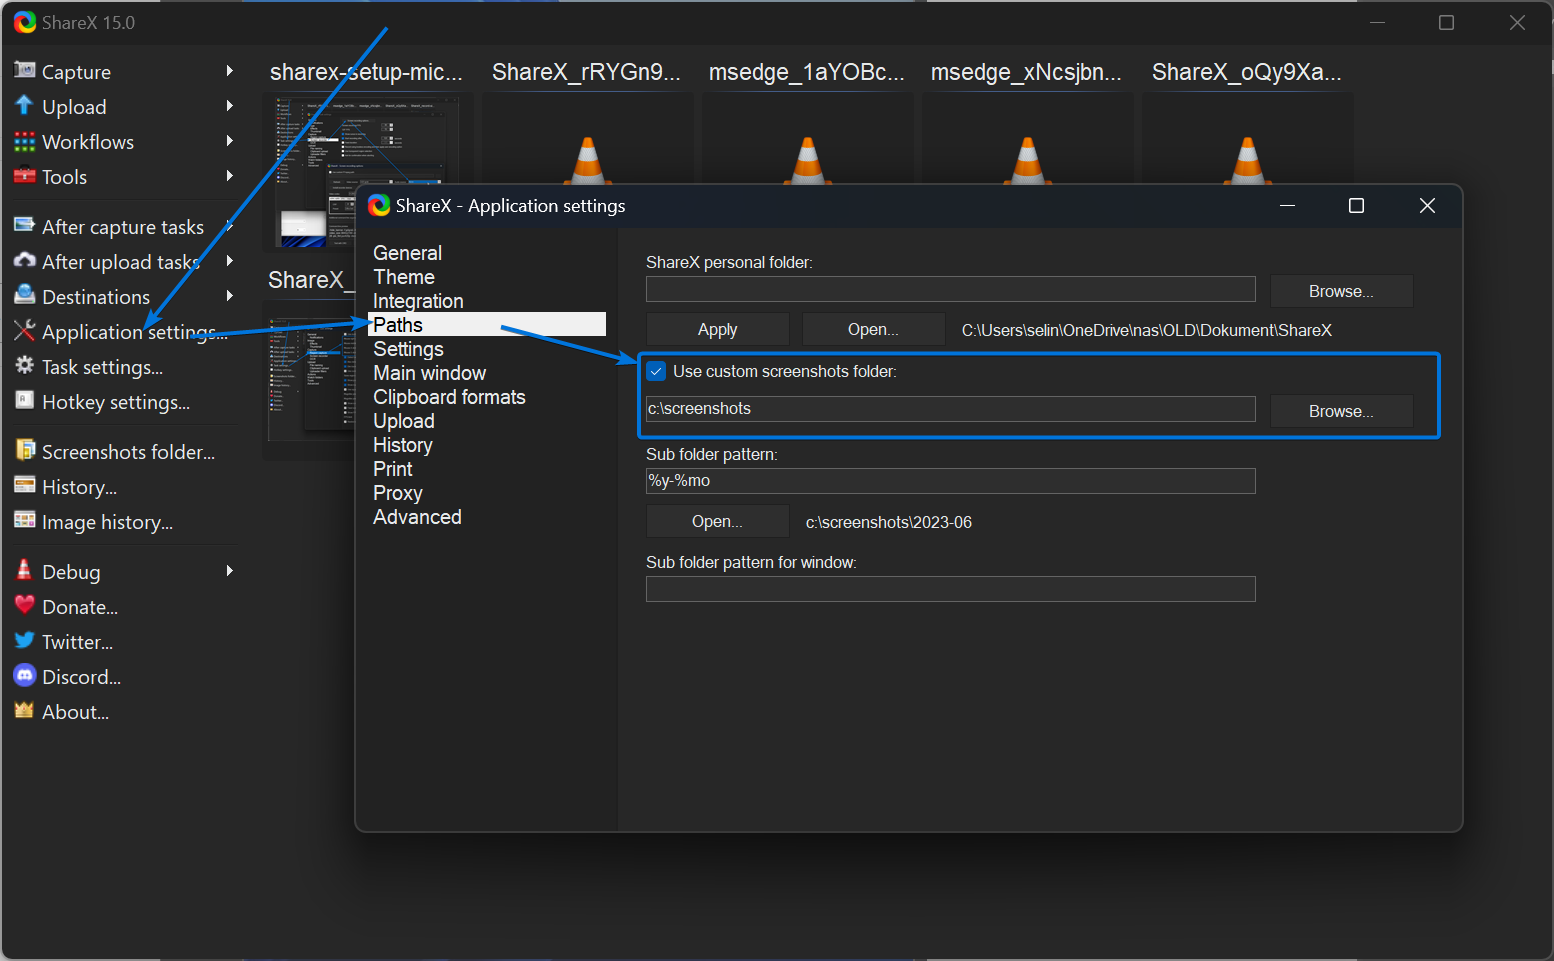
All recordings and screen shots you create in ShareX are saved to a pre-configured folder. By default, this is a folder called ShareX in your documents folder. You can go directly to the folder by using this path:
%UserProfile%\Documents\ShareX\
We can also configure a custom location by going to Application settings>Paths and check the "Use custom screenshots folder" and paste a custom path into the input field below.
Related content:
It can be a bit limiting to only record a certain section of the screen. Also, it can be hard to get the correct aspect ratio if we intend to use the footage for a specified display type.
We can control this by telling ShareX to record the whole screen.
After you have started a capture sequence and you are about to choose what area or Window to record, you can press mouse button 4 to record full screen, or mouse button 5 to capture the active monitor only.
At least this is how ShareX was set up for me by default. However, you might not have a mouse button 4 or 5 or know what button on your mouse that is.
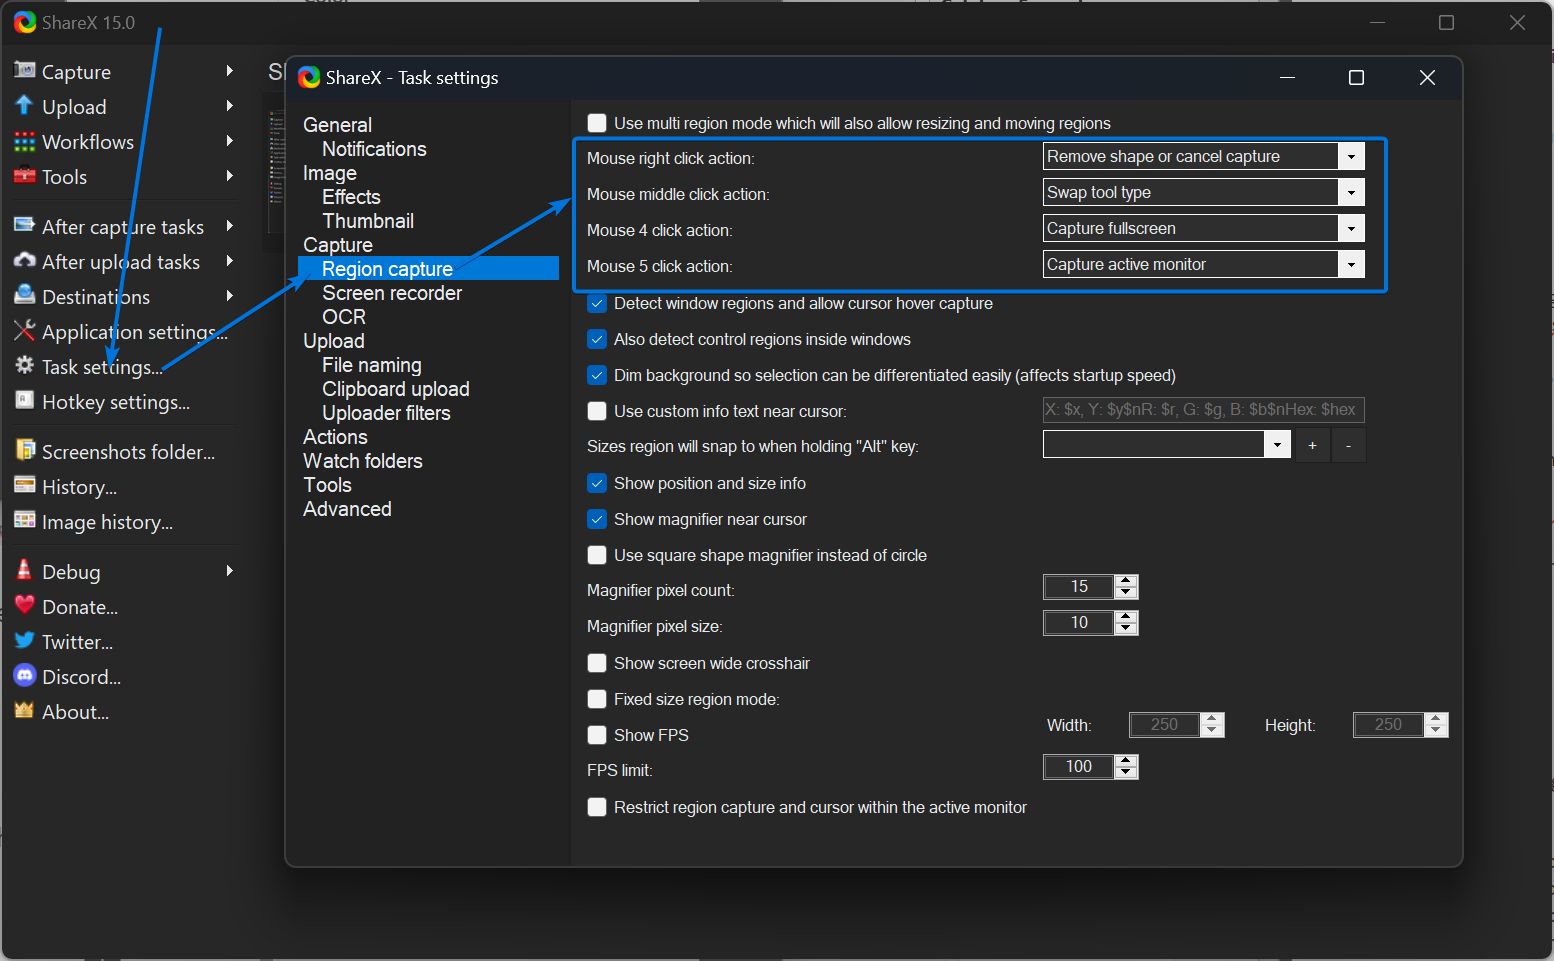
In this case, go to Task Settings and find Region capture.
Here you can set right click, middle click and mouse 4 and 5 to certain actions.
You can see in the screenshot below that my mouse button 4 and 5 are set to capturing full screen and active monitor. respectively.
You can change your mouse button two or scroll wheel click to be capture active monitor. Then you simply move your mouse to the screen you want to capture and click the button you setup to start a full screen recording.
The reason for there to be a full screen capture and an active monitor capture is for those that have multiple monitors. In this case the full screen option will capture all monitors at the same time.
If we setup capture active monitor on mouse middle click the procedure for capturing a full monitor is simply pressing Shift+Print screen followed by hovering the mouse on the desired screen and pressing middle mouse.
To stop the recording, we then go down to the tray icon and press it or you can press Shift+Print Screen again to stop the recording if you don't want to have the action of stopping the video at the end of your recording.
By default, there is no microphone setup in ShareX, so there won't be any sound in your recordings.
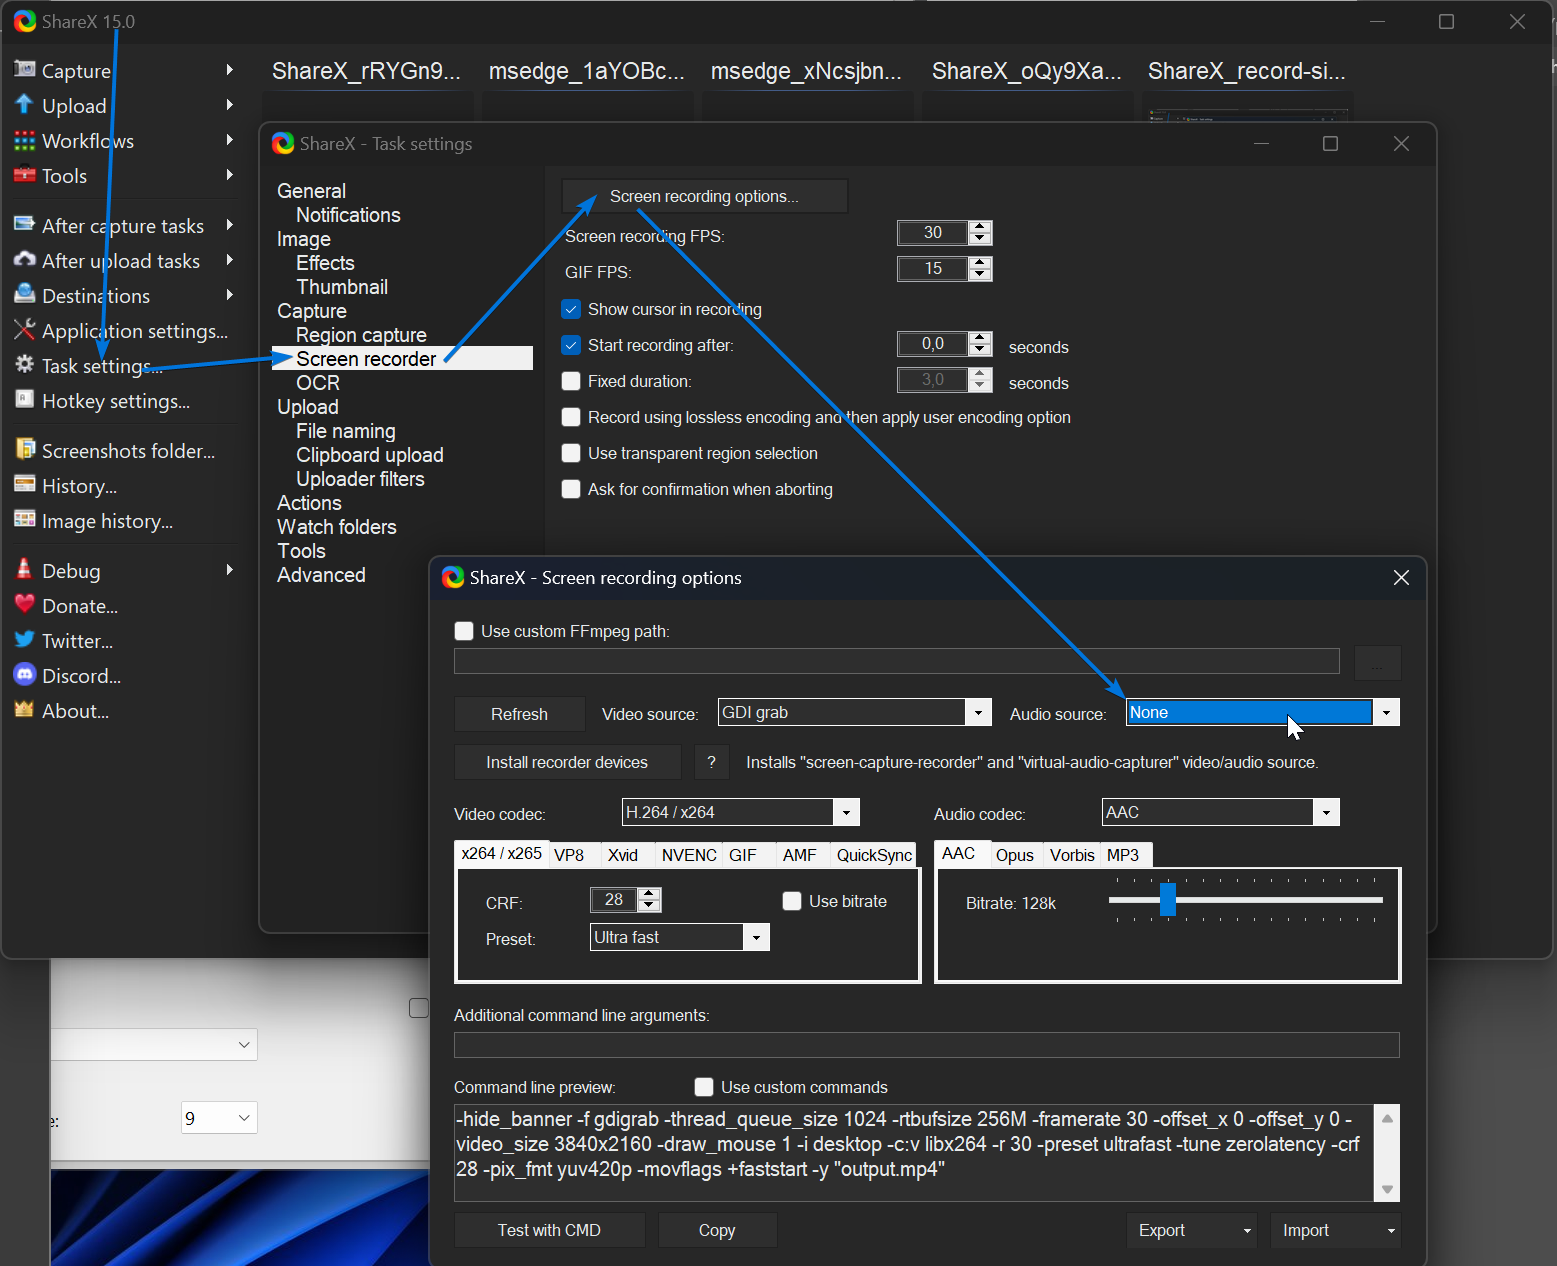
To setup sound recording go to Task settings>Screen Recorder and press Screen recording options just above the settings in this section.
A new window will pop up with some advanced recording options. Close to the top on the right side, you have an option for audio source. Click the drop down and choose your microphone from the list if you have one set up.
If your microphone is set up correctly, you can now start a recording as usual using Shift+Print Screen and the sound will be recorded as well.
In the screenshot above you can also see that there is an "Install recorder devices" button just below the video source selection. We can use this to record system audio. This is the audio that is generally coming out of our speakers.
Once installed, set the audio source to "virtual-audio-capturer" and the audio that you play on your computer will be recorded as the sound for the video capture.
There are several settings we can configure to optimize our video recording experience with ShareX. Here I will cover the most important of them that didn't fit in above.
Let's start in the screen recording options. Fint them by going to Task settings>ScreenRecorder>Screen recording options.
Here is where we set the audio source earlier. We can also set a video source if we would rather record a webcam or some other video source.
Just click the video source that by default is called GDI grab. That is the screen recording source, and set it to something else, like your webcam. No matter what region you select now, it will record the webcam instead.
Another thing to keep in mind in these settings is the video codec. While H.264/x264 is the best option for most cases, there are several alternatives to choose from, including WebM and Mpeg4.
If you have an Nvidia graphics card, you can also choose the H264/NVENC option. This makes it so that the graphics card takes care of the video encoding instead of your CPU so that you can offload the CPU if you are simultaneously recording CPU heavy tasks.
In this article we covered how to record video using ShareX. It is a fast and intuitive workflow to quickly get some clips and recordings saved to our hard drives. We learned the basics how to start stop, pause and cancel recordings as well as how to capture specific regions or one or more monitors.
We also looked at how we can add sound to our recordings by configuring a microphone and where our recordings are saved.
I hope it was helpful and thanks for your time.
