ShareX is a valuable tool to take both screenshots and create video clips of anything we see on the screen. Recording a full screen application is also possible. In this guide we will cover everything you need to know, but if you want to get started quickly here is the short version.
To record a full screen game, start the game, press Shift+Print Screen and look for the dotted outline around the border of the game and left mouse click to start recording. Press Shift+Print Screen again to stop the recording
While using this quick way of starting a recording of your full screen game or application works, there are some additional things we can learn to make the process better.
To make it a bit easier to record games, we can set up a workflow that is streamlined for this process.
To setup a new workflow in ShareX, start by going to the hotkeys settings and press add. On the left side of the new entry, press None and go to screen record and choose "Start/stop screen recording using active window region".
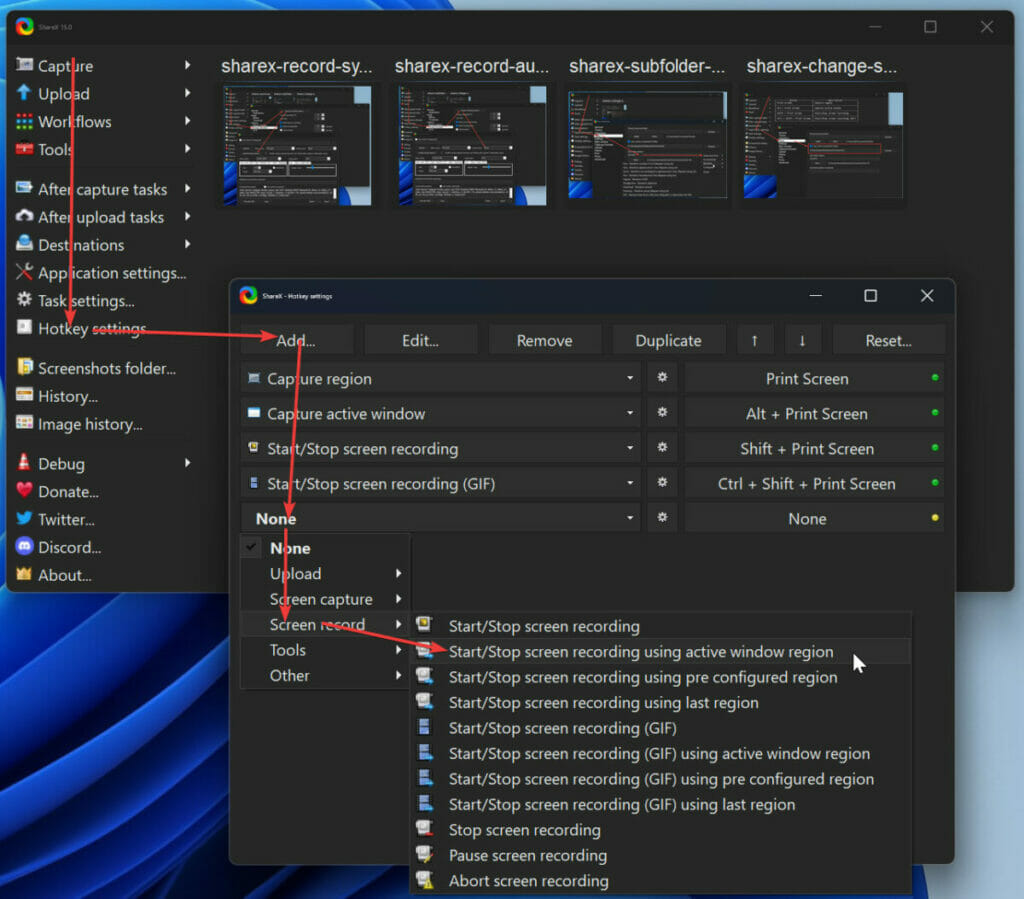
While we are in a game the active window region will be the game and if it is in full screen view, the whole screen will be recorded.
Set a hotkey for this workflow on the right side. One suggestion would be to use Ctrl+Shift+Alt+Print Screen. This way you don't accidentialy start to record or need to use an already used shortcut.
But you can pick anything you like that isn't already taken.
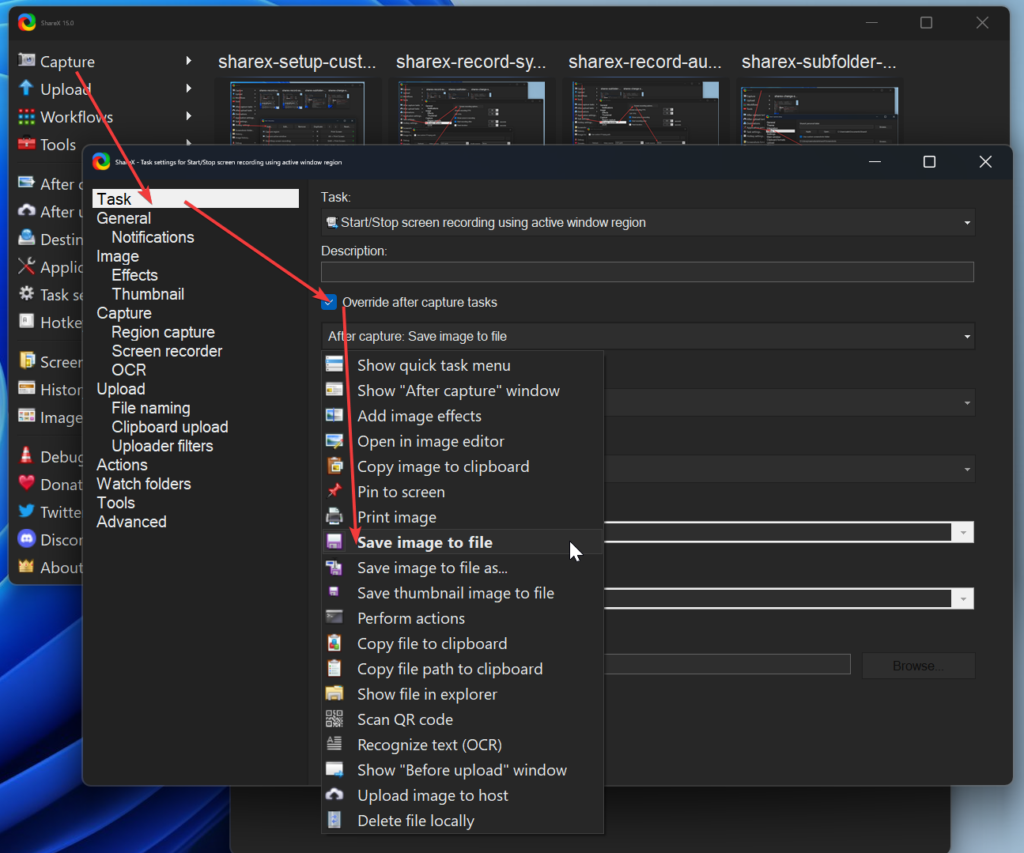
Next, press the cog wheel to setup the task settings for this specific workflow.
You can see that when in this task settings dialog, there are several checkboxes starting with the word "override". You can check any of them to override the default task settings for this particular workflow.
Go to tasks and check override after capture tasks. Next, click the dropd-own menu just below to reveal all possible after capture tasks. Those that are in bold text will be performed.
Make sure that only "save image to file" is bold. This makes sure that when we stop the recording, no extra prompts are popping up, instead, the video files is silently saved to our screen shots folder.
If you want to set up a custom screen shots folder for this task, you can do so here as well.
At the bottom you will find "Override screenshots folder". Check it and set the folder you want.
Next, go to capture and check overrider capture. This setting makes it so that we can override any settings within the region capture, screen recorder settings and OCR settings.
Press screen recorder settings. Here we can change the recorded fps. If we are recording gameplay, we might want to record at 60 fps instead of the default 30.
Here we can also press screen recording settings, but we will look at those settings more specifically later in the article.
For now, we should be good to go.
Fire up your favorite game and press your record shortcut.
You will notice that when you start to record, the game will minimize, so you have to open it again. To prevent this, run your game in borderless mode, or windowed mode instead of native full screen mode if the game supports it.
If not, I have not found any other workaround to not have the game minimize when the recording starts, but the full screen will still be recorded. We just must open the game back up after we start.
When we stop the recording, use the same shortcut. This time the game should not be minimized.
Any recordings that we create will go into ShareX's default print screen folder. Normally this is set to a folder called ShareX inside the users Documents folder.
We can change this by going to Application settings>Paths and check the "Use custom screenshot folder" checkbox and type the path into the input filed just below it.
If you want to learn more about organizing your screenshots and recordings, you can read here.
Related content:
Adding game play audio to videos we record with ShareX requires two steps. First, we need to install the virtual-audio-recorder. Next we need to set the virtual-audio-recorder as our audio source.
Related article: How to record audio in ShareX
What the virtual-audio-recorder does is that it adds an audio source that will output the sound comming from within the system. Essentially the same as anything that we play in our speakers, including game sound, any music or other sound that we play. Everything will be picked up and sent into the aoudio source of our game capture.
To add audio to any recording in ShareX, follow these steps:
If you want to add audio to the workflow that we created above, instead of boing to the task setting directly, first go to hotkey settings and press the cog wheel to the workflow we created earlier. Next go to capture and check the override capture settings checkbox, then go to screen recorder and open screen recording options to finally add the virtual-audio-capture audio source there.
Now any sound that is being output by your game will be recorded along with the video footage.
By default, ShareX uses the CPU to encode the video it records.
However, when it comes to recording game footage, we might want the choice to encode using our CPU or GPU. ShareX allows us to make this choice if we have a Nvidia GPU. In these cases, we can choose to use the NVENC encoder.
Nvidia graphics card has dedicated hardware to encode video and won't have a significant performance impact on the game you are running while simultaneously freeing up the CPU.
Here is how to setup ShareX to use the GPU for encoding instead of CPU:
Keep in mind that the Nvidia encoder has limits on what it can encode. For example, it cannot encode x265 or DivX, but what it can do is most often enough except for high end productions.
In this article we looked at how we can record gameplay and other full screen applications. One example could be a Power Point presentation that you would like to record.
We learned how we can add audio comming from the system itself to the recording as well as where those recordings go when we stop recording.
We also took a look at to use an Nvidia GPU for the encoding instead of the CPU if our system has this capability.
I hope it was helpful and thanks for your time.