Sometimes our screenshot workflow requires a custom location. Luckily, we can use ShareX to automatically save screenshots to a custom folder either on our harddrive or a shared network drive if we are working with a team that requires access.
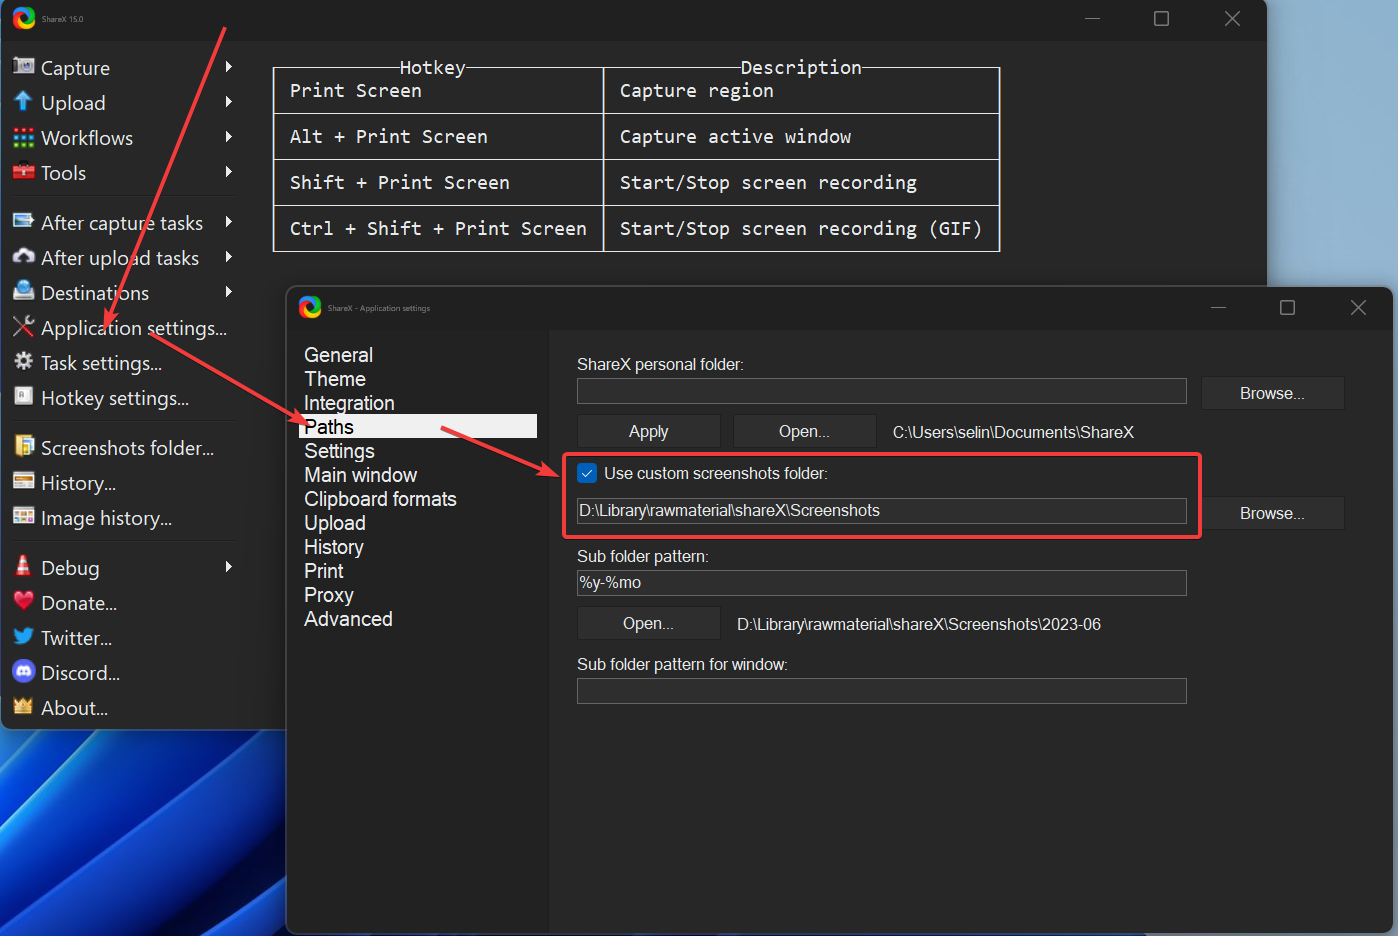
To change the screenshot folder in ShareX go to "Application Settings>Paths". Then check "Use custom screenshot folder" and enter the path in the field below. You can also press the browse button to browse for the folder you want to set as the screenshot folder.
Let's explore some common use cases, problems, solutions and sub folder patterns for when we take a lot of screenshots.
In some cases, users have reported that they needed to run ShareX as administrators to be able to change the screenshot folder. If this is the case for you, right click the ShareX shortcut and choose run as administrator. If you don't have a desktop shortcut the default location for the ShareX executable is located here:
C:\Program Files\ShareX\ShareX.exe
Browse to this file, right click it and choose run as administrator and press yes when the UAC warning appears.
Another problem that can occur is that if you have mapped a network drive and use that for screenshots, you need to make sure that it is mounted correctly and accessible when you take your first screenshot.
If this is a problem, it can be a good idea to store screenshots locally before transferring them to a shared network drive or a cloud storage service.
If we open ShareX, go to Application settings go into the paths settings, we can see that there are two fields for sub folders.
The subfolder pattern will create a new folder if a folder with the same name doesn't already exist as a subfolder. In that case, the screenshot is simply put in the already existing subfolder.
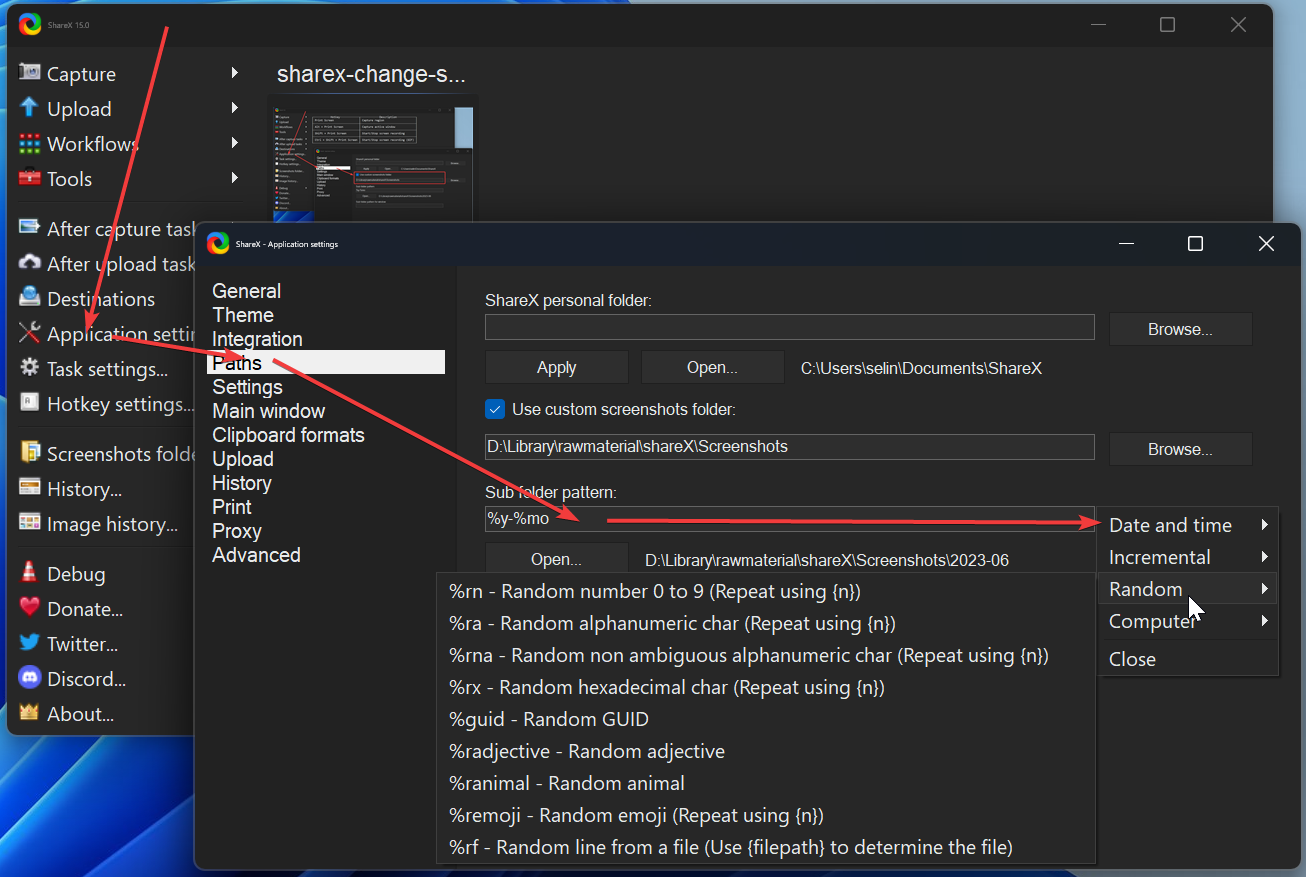
By default, subfolders are organized and named as YYYY-MM. Four digits for the year, followed by a dash and two digits for the month and the pattern itself looks like this:
%y-%mo
We can click on the sub folder pattern field to open a menu with all patterns available. When we choose a pattern from the list, the corresponding code for the pattern will be pasted into the field.
You can specify any subfolder pattern you want. Just keep in mind that if you have something like a random number of minutes in the folder, you will end up with a lot of folders.
I find that the year and month folder system that is set up by default is quite convenient since I can then go back into a folder based on when I took the screenshot.
If you are sharing screenshots in a team, it can be a good idea to also include a username with %un so that everyone knows who has taken the screenshot.
The second row with the label "Sub folder pattern for Window" refers to screenshots taken of a specific window. Either from hovering a window when taking a screenshot so that only that window is in the image or from going to Capture>Window and choosing the window you want to screenshot.
For these screenshots we can access information from the screenshotted window to use in the folder name. Namely the title of the window and the process name of the window.
Both these kinds of subfolders will be stored in the same screenshot folder but with different patterns. If the "Sub folder pattern for Window" labeled field is empty, all screenshots will fall under the first pattern.
If changing the path of the screen shot folder and organizing the screenshots in subfolders based on patterns isn't enough, we can also change the naming pattern of the screenshots themselves.
The pattern for the screenshots is located in the taks settings. Once there, press File naming under the upload category.
Here you will find the same two kinds of naming as for folders. One for window specific screenshots and one for all other screenshots.
By default, screenshots are just named with 10 random numbers and characters while window screenshots have the process name added at the beginning followed by an underscore. before the 10 random characters.
You can change this to include dates, times or incremental numbering to give a few examples.
In this article we learned how to change the screenshot folder path as well as how to solve som common problems when it is not working. We then continued to look at sub folder organization and finally we also learned where we can find the settings to change the file naming patterns themselves.
I hope it was helpful and thanks for your time.