A tag is a grouping of notes. You can search for a tag or browse for it in the tag browser in Obsidian. This helps us find all occurrences of the tag and also all related notes.
To use tags in Obsidian, type a #-symbol immediately followed by the name of the tag without spaces. For example #tasks or #recipes. Many people refer to the #-symbol as a hashtag, but it can also be called a hash mark, number sign, or pound sign, for example.
To find all notes with a certain tag, open the tag browser by clicking the icon on the right side of the header that looks like two tags on top of each other.
In the rest of this article, we will cover how tags work and some tips on how we can use them in our workflow.

The simplest way to create tags in Obsidian is by making a #-symbol in your note followed by the name of the tag. The name needs to be a one word with no spaces either between the #-symbol and the name or in the tag name itself.
For multi-word tags, use a dash, underscore or camel case to distinguish between words.
We can also use tags in the meta data of a note. Note that when adding tags to the meta data of a note the tags need to already exist.
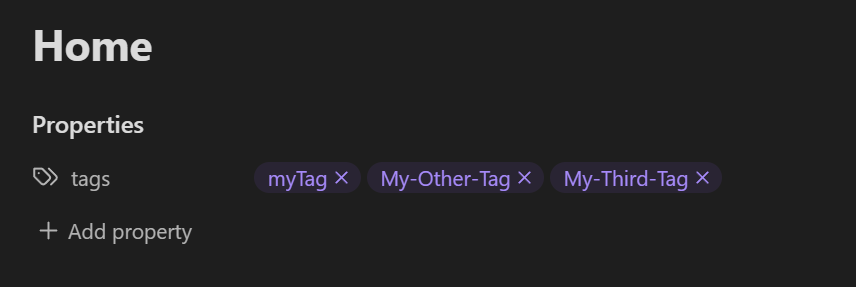
To create tags in the meta data start by adding three dashes followed by enter. You will be presented with an interface to add a property. Add the tags property and type any tag you want to add to the note. Obsidian will filter existing tags as you type until you find the one you need. You can add multiple tags to this meta data proeprty.
This is what you type:
---
 tags: myTag My-Other-Tag My-Third-Tag
This is what it will look like in the interface. This note now has these tags.
To use tags start by adding a tag to one of your notes. In your note, type the #-symbol, Generally created with Shift+3. First Obsidian might appear to create a headline but if you continue typing the name of your tag it will become a tag.
For it to become a headline instead, follow up with a space after the #-symbol.
To find and navigate tags there are primarily two ways. Through search and through the tag browser. Named tags in Obsidian. It is the icon that looks like a literal tag.
If you don't see the tag icon, note that the tag panel requires you to enable a core plugin called tags. To do this, go to Settings(cogwheel icon in the bottom left corner). Click core plugins and make sure that "tags" is enabled.
Then you should be able to access it like this.

In this example, I have notes in my vault with two tags. We can sort tags alphabetically or by how many times a tag has been used.
If we click on a tag, the search window will appear and make a search for the occurrences of the tag, listing all related notes. Clicking on a note in the search window will then take you to the tag inside that note in the main window.
In case you have a tag in a canvas note. The tag will not appear in the tag browser if the tag is inside a card. In those cases you need to convert the card to a note in your canvas. However, even tags inside cards on a canvas will appear when we search for them manually.
Related content: Complete tutorial to canvas in Obsidian
You can search manually for any tag by starting your search with tag:# followed by the name of the tag. For example, tag:#workflow to list all notes and canvas notes, including a card with the tag #workflow.
Tags can help us organize notes and group related notes together. This is a great complement to the linking system inside Obsidian.
Related content: How to use links in Obsidian
There are several established ways to organize notes. Such as a second brain, a.k.a, zettelkasten or smart notes to name a couple.
But depending on your needs you can start by learning about these kinds of organizational systems and the adapt them to your own way.
For me, I use Obsidian for documenting and journaling. For example, while documenting every step in a workflow process, I might use links to link one step in the process to the next. But I may also include tags so that I both have a grouped organization and a linear organization.
I then use other notes for concepts, explanations, thoughts and ideas and link more freely, referencing these tags. For these kinds of notes I use other tags to group them together.
Remember, a note may have as many tags and links as you like.
Experiment and find the system that works for you. It does not have to be perfect from the start. You can adjust it and let it evolve over time.
Obsidian also supports nested tags. Inside your tag name, use a / to create a nested tag. For example, in my blog writing I have a certain workflow. So I might have a tag called #blogwriting and then I might have nested tags called #blogwriting/writing, #blogwriting/editing and #blogwriting/publishing. This way I can tag notes depending on what part of the process the note is about.
We can nest tags multiple layers as well. Just add another / just like we do with folders.
I can then filter any of the subtags by themselves or simply filter to the #blogwriting tag to find all notes related to the entire process.
We search and filter nested tags just like with regular tags. Using the tags browser together with the search feature.
To search for a nested tag manually, you simply use this formula: tag:#blogwriting/editing to find only the nested tags and tag:#blogwriting to find all tags and nested tags.
We can also do similarly for notes that might represent tasks. We can have a #todo and then we can use nested tags for priorities or categorization.
If you are a avid template user, you can also use tags in your templates. For instance, if you are an avid template user, you can incorporate a #dailynote tag into a template that you use, which will automatically add it to your #dailynote tags.
Another way you might want to use tags with templates is if you use Obsidian for a todo or personal ticket system, you can create templates with priorities or categories to keep even more organized.
It all depends on the way you like to work.
Obsidian also have a community plugin that extends the functionality of tags further called Tag Wrangler. This plugin adds a right-click cointext menu to the tags panel with a few options that can help us manage tags.
To install Tag Wrangler, follow these steps.
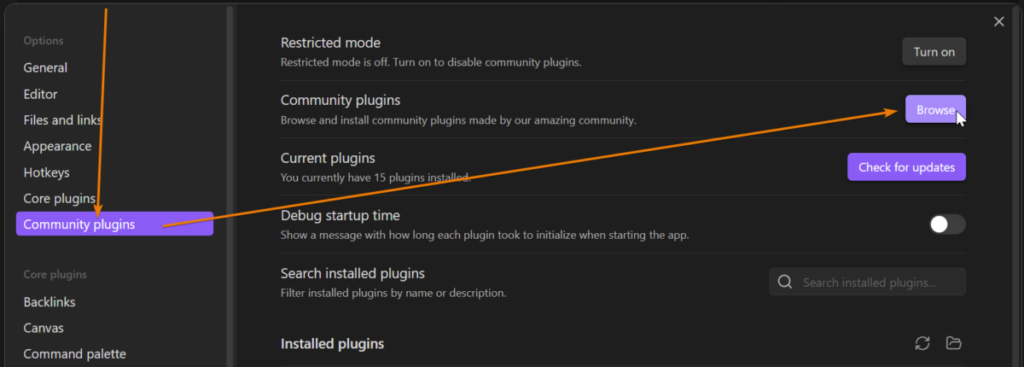
Find community plugin brwoser here:
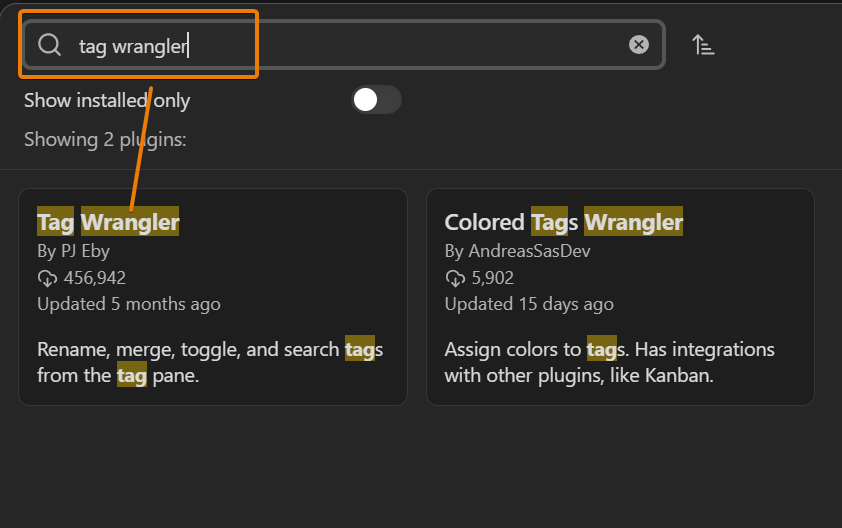
Search for tag wrangler and find it in the browser.
Tag wrangler is now installed but it does not have any settings like most community plugins. Instead, it gives you access to a right-click context menu in the tags panel. CLick on any existing tag to view it.
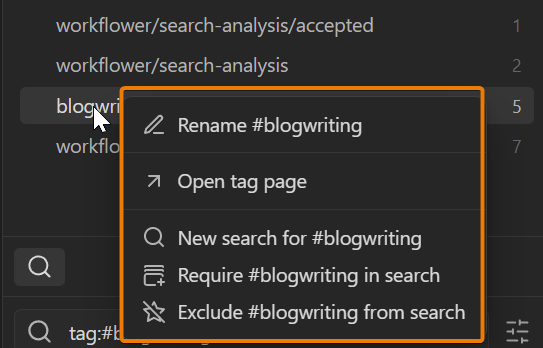
Probably the most useful feature of this plugin is the rename command. We can right click a tag and choose to rename it. This will look through all pages with this tag and rename the tag on all places at once.
We can also use this to merge tags. For example, if you misspelled a tag somewhere, or you have two similar tags that should really be just one tag we can use the rename feature to rename one of the tag the same name as the other and Tag Wrangler will merge the two tags.
Note though, that it is much harder to undo a merge since you would have to rename all those tags by hand. So be cautious and only merge if you really need or want to.
Tag wrangler also makes it easier to search through specific tags and tag categories. For example, lets say that you have a tag with three subtags.
Let us also say that you want to search for only two of the subtags and exclude the third subtag. You can do this by right clicking and choose "new search for #tag" on the top level tag. Then you can right click the tag you don't want and exclude it from the search by choosing "Exclude #tag/subtag from search".
In this article, we covered tags in Obsidian. From simple steps like creating tags to browsing and searching them and combining them with links to organize our notes.
We looked at sub-tags, adding tags to the metadata of a note and organizing them. We also discussed the use of tags together with templates and learned about Tag Wrangler.
Renaming and merging tags and some more advanced search features.
Thanks for your time.
