ShareX is primarily a screen shot and clip recording software. But it has several neat tools available as well. One of them being the color picker that lets you
To use the color picker in ShareX, go to Tools>Screen Color picker and click the pixel on the screen you want to sample. The hex code for the color of the pixel you clicked is then copied to the clipboard for you to paste anywhere.
Let's explore the color picking tools in ShareX a bit further.
Let's start by going over how to use the color picker to pick a color from your screen in a step-by-step fashion with images first.
First, Start ShareX, if you don't have it installed, you can get it here for free. It is an open-source software.
External content: Get ShareX
Press download followed by setup to download an executable setup file for the software.
Once ShareX is installed, go to Tools in the left side menu and choose screen color picker.
When you click the screen color picker, the cursor turnes into a crosshair and a magnifying glass appears next to it, showing a magnification of the pixels around the crosshair.
This is so that you should be able to see what exact pixel you are picking a color from more easily.
You can also see a preview of the color, the RGB and Hex values for the color of the currently hovered pixel as well as the X and Y coordinates of the pixel on the screen.
Here is an example where I hover over the toolbox icon in ShareX. You can see in the magnifying glass that we are looking at the corner of the icon and that it has several shades of red.
In this example, if I click this pixel, the value E05858 will be copied to the clipboard.
I can then paste this string of letters and numbers with Ctrl+V in any text field.
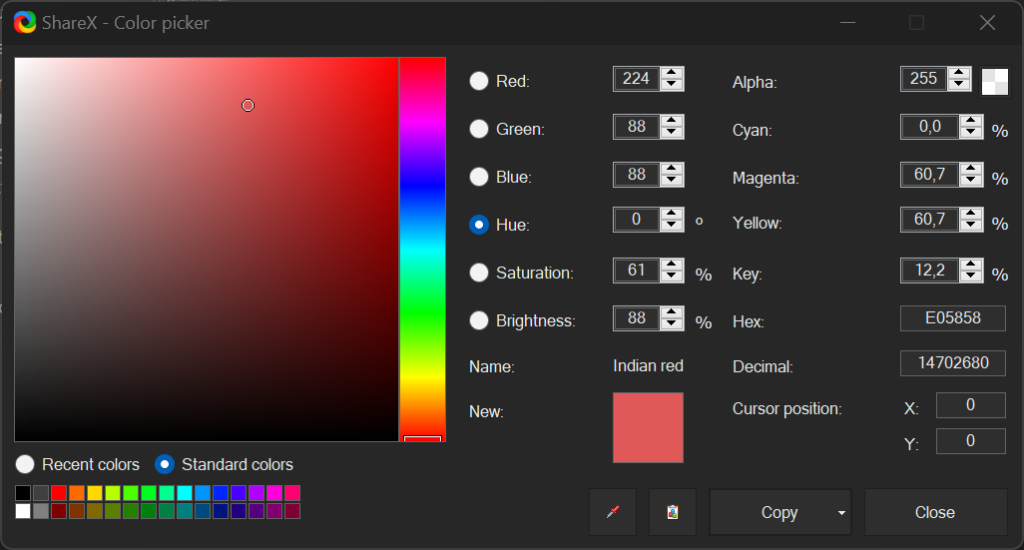
There are actually two color pickers in ShareX, above we covered the screen color picker. But if you got to Tools>Color picker another interface shows up where you can pick any available color from a pallet. Here you can get the color in multiple formats copied to your clipboard. Just press the copy button to pick your format.

If we previously used the screen color picker, you can see that after opening the color picker to pick from a pallet, this interface is set to the color we picked, so if you need to pick a color from the screen but you need a different format, you can just open this window and copy the format you want from the list.
We can use this interface to pick directly from the pallet, choose any of the standard colors listed just below the pallet or switch the radio button over to recent colors to pick from previously sampled or set colors.
We can also choose a color based on the red, green and blue channel as indicated by the first three values on the right side.
There is also a value for alpha if we want to copy that fourth channel over.
It is also possible to pick a color based on the CMYK color values, insert a hex code or use hue saturation and value.
All of these are simply different ways of dividing up a color into core components.
There are also two buttons to pick color from clipboard or a shortcut to the screen color picker discussed above.
If you find yourself using the color picker or screen color picker often, you might want to set up a shortcut for either of them.
To setup a shortcut for one of these tools, open the ShareX window and press Hotkey settings.
Next press Add in the top left corner. This will add a new entry to the list.
To the left in this new entry, it says none, press it and to go Tools>Screen color picker
Or simply color picker if you want a shortcut to open the color picker interface.
Next, choose the shortcut you want to set up for this command by clicking on None on the right side.
In this article we explored the color pickers in ShareX. Both the screen color picker and the color picker paletter.
We learned that the screen color picker copies the hex code to the clipboard that we can then paste anywhere. We also learned how the color picker interface works and behaves when we have picked a color using the screen color picker first.
We then looked at how we could add a shortcut to the color picker.
I hope this was helpful and thanks for your time.
